Showing posts with label journaling. Show all posts

Sunday, May 20, 2018

Art Journal Challenge: Journaling


 Did you think I wouldn't be around today?
Nope, here I am!
I did get my crafty time in earlier, but haven't had time to blog until now!
Lots of exciting stuff going on today, but you'll have to wait a little bit longer to really hear about it!
So the prompt for today is Journaling
I don't always add this element to my art journal, but lately I have been.

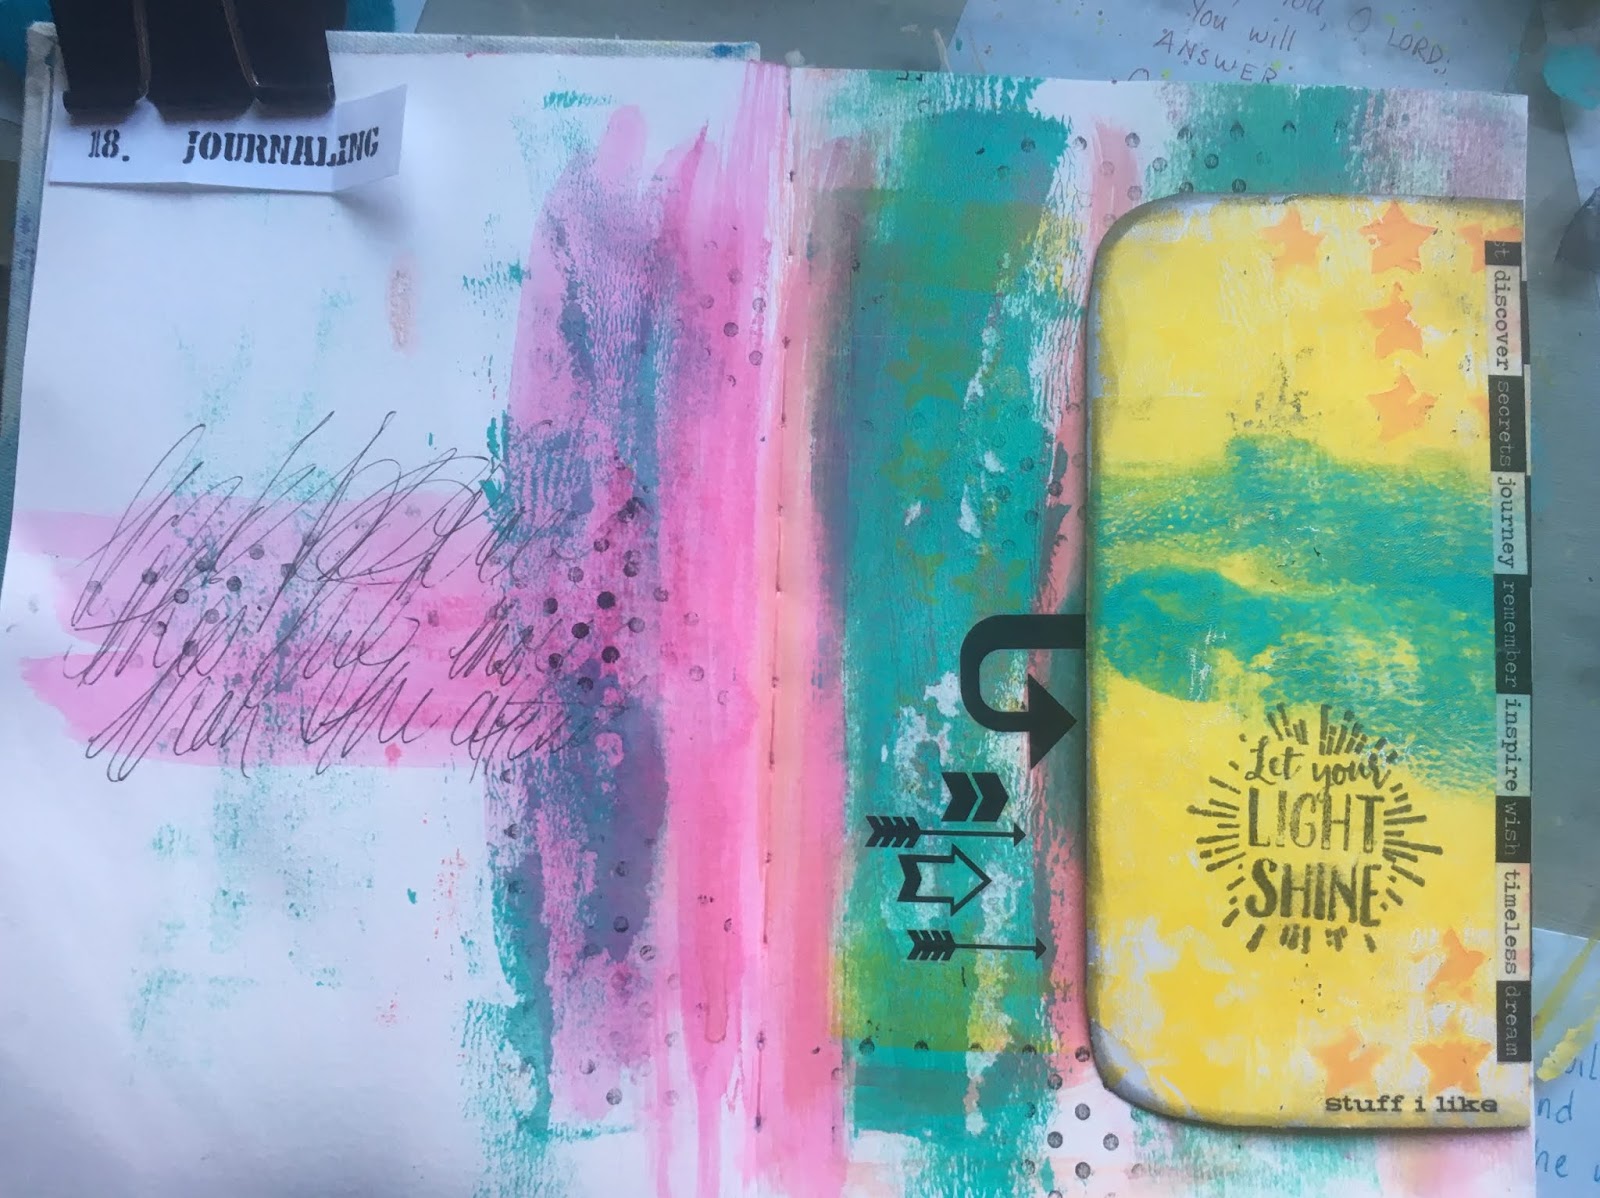
Here is the finished product,
I clipped the prompt to the upper corner.
  I'm sure you're wondering where the journaling is,
well, it's under the flap!
See, there it is! 
I tried to keep it sort of simple today, 
the journaling was a great add, but I am missing my fude ball pen,
so I did have to order a new one! 
The flap is held on with a bit of washi tape,
The background is just a bit of paint.
The arrows are part of some Tim Holtz rub ons, as is the blessed card.

Want some more pics? Of course you do! 


Ok, thats all for today, I hope you are having a wonderful end to your weekend!
Remember to leave a comment for a chance to win some scribble sticks! 


Saturday, June 16, 2012

SC challenge # 19

I have loved the Saturated Canary "usherette" since I first saw her! 
 (find her here!)
And I kept saying "I'll use her for this..." or "I'll use her for that..."
Well today was finally the day! 
Over at the facebook Smash* aholics page there is a challenge to use a digi in your smash*book
So finally a chance to use the pretty usherette and some of my old movie stubs

I used some copics, and prismacolor markers to color her in, then snipped her out and smashed her down!
I also got a chance to use some of the amazing box of ric rack I found this weekend at an estate sale...


I added a little writing, and an xo sticker... doodled a little around the "frame" and added some hearts! 
I Love her!!!  
entering into SC challenge #19
and also showing it off for the smashing facebook group! 
Please feel free to check out some of the other stuff I've done!

Wednesday, May 30, 2012

Prompt: Wacky

This past weekend at our smashing Smash* crop
Holly gave us a prompt for the evening... it was Wacky...
I had literally smashed the background of this page prior, using my new 
Acrylic Dabbers using this technique and had added the Starburst wrappers 
thinking I would do a candy page!

But the colors just screamed WACKY
and so I went to work... Hoping that my toils would win me a small smash* book prize


The pics I happened to have taken with my Ipad on our recent Grand Canyon
trip with mom and dad... they are in "infrared"

I had stamped and painted the kites earlier in the day


using of course my ranger distress inks after stamping and embossing the outline I 
used my paintbrush with a little water and the ink I filled 
in the kites... it gives a cool water color effect

Next I added some of my smash* pad top 10 notecards


I added the washi, made some "Wacky" "Color" tags

Voila! While I don't think it won me a new smash* book (I left before the drawing,) 
it was very satisfying to finish a page
and to use the funky pictures that I thought would never make it into any
book! 

Do you have that funky picture that you don't think will fit anywhere??  Are you bold enough
to just go for it??

Sunday, May 27, 2012

Where'd this come from?

This is what happens when you leave your supplies out
and your scrappin buddies come along and make you a smash* page


Last night I went to my very first smash "crop"
I nervously packed up a bunch of supplies, and wondered what to expect.
I had been working on some of the pieces of this page all day... Especially the "ROXY" sign


Which is was all hand made, and the ribbons and lace and washi were added by the girls
during the crop hop.

The washi flags on twine were a hit, and I'm sure I'll be seeing a lot of those
in the girls work over the next few weeks! 
And they're super duper easy to make!


As a last minute addition to my supplies I pulled out the tag... I didn't know it if
would get used, but it's just perfect with the additional "dog"
bling! 

This page just screams Roxy... She's a bold fun princess...
Who we learned doesn't really love the outdoors as much as we thought she
would, and always sleeps at my feet to "protect" me.

Thanks girls for the wonderful page!
The best part about the crop (other than the company of course)
is that I have lots of pages to share with you this week! 
Come on back tomorrow for inspiration monday! 

Wednesday, May 23, 2012

Flowers??? How thoughtful

Sometimes I find myself wandering around those big box stores admiring the pretty "spare parts" 
the wonderful flowers that look flawless.....

I pick them up and do my best to try to figure out how they were made....

I of course picture a big factory where these flowers are churned out by the thousands... 

I CAN do it! 

So I decided to try.... 

1. Pick out your fabric.... Satin seems to work best but you can use any kind you want.

2. Cut circles from your fabric.  These can be as big or small as you would like, but you want them to get progressively smaller.


3. Light your candle.


4. Burn just the edges of the fabric.  If you're using satin you will notice how the edges start to curl up.


5. Layer your burnt circles with the largest on the bottom.  There are many ways to finish off the flower.  You can glue the circles together, you can sew them, you could punch a hole in them and use a brad to hold them all together.


Voila!  You have a beautiful hand made flower to add to your art project! 

I like to make them while sitting on my couch watching my favorite show... then they are all ready to go when you start a new project!

Saturday, May 12, 2012

Saturday finds

About two months ago I stopped working the graveyard shift, and now have to be up at 4:30
in the morning 3 -4 days a week.  
However I'm off on Saturdays! 

So at 6 am I get up, make a cup of coffee, and head out to see what I can find to use in my art!

Today I ventured up to a 55+ community and ran into a couple of estate sales.
Sometimes they creep me out.. but I'm in search of maps, and vintage metal findings,
books, ect...

Today was a bit of a treasure trove!

Maps, pictures, a copy of "Little Women" with a signature and date of 1949. 
The pictures are all old black and whites, 


and there are actually about 5x's the amount of 
postage stamps as you see...

The maps are from Germany, and most dated in the 80's


There was also this little hand held scorecard for Bridge


All are enough to get the creative juices flowing...
The bonus is that the stamps I found have some value... I paid 50 cents for them, and I found one worth 15.00!  I'd say that's an investment... If I could find anyone to buy it of course!!!

What do you look for at yard/estate sales??  How do you plan to use them in your future projects?  
Please feel free to post your pictures, or link up to the treasures you have found!  T
Thanks for looking, and come back soon!

Sunday, May 6, 2012

Self portrait

I love to follow the challenges on http://artjournaling.ning.com 
While I haven't had a chance to do any of their challenges up until now, I love the 
inspiration that they throw my way!

This week the challenge is to do a self portrait.....
While looking in the mirror, and without really lifting the pen from the paper! 
Oy I said...
I can't draw....
Then I realized that was the whole point right??  

Just do it!!!  
Try something new!
Sooooo......


this is mine.....


No, I don't have pink hair!  or green eyes for that matter....
Part of the challenge was to use your favorite color...
So I colored my face yellow! 

Then I looked over at my doggin Sierra, and figured why not... so I drew her too!  Isn't she cute??


Check out the challenges...
And enjoy the journey.... after all isn't your art journal a place for discovery and trying new things???

Thursday, May 3, 2012

10 tips to get past the blank art journal page

10 Tips
to get past the blank art journal page!

1. Put down a wash of color... Use watercolors, or acrylics.

2. Tear out a page of a magazine and modge podge or glue it down on the page.   Any magazine page will do... after all, you're probably going to cover it up again!

3. Distress just the edges and corners of the page.


4. Stamp your page directly from the ink pad and then quickly spritz with water.

or my favorite.......

This seems to work very best with the ranger distress inks as they stay wet longer.

5. Glue or modge podge a ripped up dress pattern to the page.

6. Haphazardly stamp with any of the rubber stamps you have not yet used, or haven't used in a long time!


7. Glue or paste that old calendar right onto your page!


8. Use something unexpected... try rubbing with charcoal, or how about some of those retread tires we see on the side of the highway? (Please be careful!!!  Don't get hit!!!)

9. Stick all your drink wrappers on a page... think the green tea bottle you just threw away, or the cup of joe you drank this morning.


10. Use that punchinella!  Abuse it!  Use all the ink pads you have!


After I put down a background on a page I usually shut my journal and leave it... Then when I'm ready to do a page I already have a bunch of backgrounds ready to choose from.

Tuesday, May 1, 2012

Translating a hobby!


#5 Hobby

My list of journal prompts from Mary
includes this beauty...
When I was at a recent meet up one of lovely ladies triggered an idea for this page. 


You see art journaling was not my first love... In fact, I had a whole life as a sewer and quilter prior to this adventure.  I even tried to sew a pair of pants once... that was a MAJOR fail!  

I am a lover of all things sewing though...
 I would love to have a dress form just for the inspiration it might lend to me!

I was super excited to use a leftover apron pattern in my art journal. 
I modge podge'd up the page and slapped that bad boy down!
Then it tore... and it didn't fit quite right... 
So I added some more pieces, and I stamped it up some using my Ranger distress inks!


It was starting to look better.... Then it hit me... since I was already going for a little sewing theme, why not actually sew on the pages??? 

So I pulled out my embroidery threads that mom had given me last time she was here.. and I went to work on the edges! 


Then I added a little sewing in the middle of the page with a piece out of my scrap dictionary about a "pattern." 


On the opposite side I used some glitter glue to write "Sewing Machine" 
and some ribbon that looks like a tape measure.  


Finally I added a quick sewn paper flower that I adapted from this tutorial.

I hope you enjoy!
What is a hobby that you would journal about?? 

Sunday, April 29, 2012

Orange

Create an orange page!

It's such a bright and happy color... but how do you make a whole page of orange???


This page is similar to one that I saw online, and while I should have written down the site, I didn't, and then of course I couldn't find the site... Luckily for me I did however write down some of the things on the page... This is my version of that page.  


I journaled exactly what I was doing at the time I was doing it.... 


The background is orange watercolors mixed with wild honey Ranger ink, and orange glitter watercolors.  The lettering is stamped using black soot Ranger ink.  And the white writing is a jelly roll.  

This page was super easy to make, and I love that it went together so quickly!

Wednesday, April 18, 2012

Smash Book..... a work in progress

I seem to have lots and lots of Works in Progress.........
Hubby always makes fun that I never seem to finish anything, maybe it's the little bit of a perfectionist that lives inside me, but I want things to be just right.......

When I started Art Journaling earlier this year I promised myself that I wouldn't do this with the art journal, that I would just turn the page and move on....
For the most part I have been able to do this, but I have one page that has been very slow to progress, and that I seem to always want to tweak!


This is that page for me.....

It just doesn't seem to have enough "stuff" on it! 

First I did the background and added the bird... then it sat for a while...
Last week I added the lettering, and then it sat for a few more days
Finally I started writing... Just whatever I needed to get out.

I love that I got to use my punchinella for the very first time on this page, but it still doesn't feel quite right.
Maybe I should add a tree next to the bird? 


Or some glitter or fun stickers??  Maybe I should let it simmer for a while longer??
What do you do when your pages aren't just right??

Monday, April 16, 2012

Art Journal Travel Page

I am totally in love with learning new techniques and trying out new crafts.  I tend to jump from project to project, and am super excited when I finally finish one thing!  While the Journal itself is not done... NOT EVEN CLOSE!!!!  I did however finish this page! 


Hubby and I made a quickish trip to California at the beginning of April, and this is the page that ensued!  At the prompting of Mary (Mary's blog link) I am trying to do 30 pages of my journal, and this one came together lickity split! It's very nice to have those prompts to fall back on when in-spi-ration (as Chef Ron Ben-Isreal from food networks Sweet genius) would say!

There wasn't too much technique/ magic involved in this page, lots of modge podge and some fun postcards that were a give away at the restaurant we fell in love with.  I started with a wash of water color for the background, and cut up a piece of a larger touristy map that I picked up at our hotel,

then added the fun postcards, tape and travel page (K&C) and voila! Super Easy, just add a little journaling and it was done! 


I do find that it's much easier to start a page if I put some color on it first!  There is something about that big blank white page that is very scary!  

Please feel free to leave a post!  All input is greatly appreciated!